
|
Bonjour!  ⊰Brittany Wolf⊱ Hello- This blog is dedicated to my creatures and my WIP's Please feel free to leave comments :) Tags
|
The Little Mermaid Process- Sign up now!  The Little Mermaid Process- Sign up now! Started an Ariel jewelry holder for my own personal use. I will cover my thought process, armature, sculpting, sanding, painting, etc. Any pledge! :) Lacie Loves You!   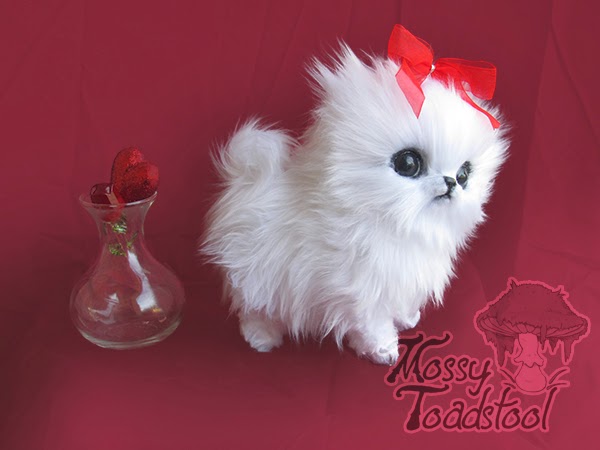      
Labels: butterfly, Canine, for sale, Holiday, Teacup Lacie!!
Meet my Newest Creation! Lacie! She's a Teacup Pomeranian 💝 Finished her last night and took a quick pic of her! I will do more photos tomorrow for better views X3 Shes so cute! I loved making her! Pose-able wire body - Hand sculpted Sculpey head and paws, no molds used. Face and paws are hand glued fur. Eyes, Nose, Mouth and Paws painted by hand and glossed. This one was certainly made with love ~💕 New Tool in my Arsenal! My method is that I work from back to front. I lay down a small patch of Aleene's Tacky Glue (dries clear and bonds so well!) then I cut a patch of fur roughly the same size as the glue from its backing (a little thicker, its easier to have too much fur then too little!) and lightly push it into the glue, but just enough so I know the fur is in the glue. Its tedious, but its so worth it! Now when it comes to trimming the fur (since I always cut it long and as close to the backing as possible) There's a few things I would use. Scissors were my first, however its rather hard for me to make it look smooth in small detailed areas (it would look blocky) Then, I had purchased a new Clipper fro my dog. The old one (thoroughly cleaned) then became my fur trimmer. Yet again I had issues with the really tight spaces. Then I found something that is just perfect! I introduce to you,
Eyebrow Razor!!
It started by me trying to use an X-acto blade for trimming around the muzzle of the Teacup Pomeranian doll I was making. My mom asked me what I was doing, I explained, and she told me to hold on a minute. She went into the other room and pulled these babies out- new in package. She said she bought them a year or two ago and just never got around to using them. So I straight away tried them, and my goodness, they were just perfect! You can use an X-acto blade for this, but because these are ment to thin out hair in a small area I believe it to work a lot better and faster.
So I just wanted to share this with you guys :D
Labels: Tutorial Mushroom Pin Cushions!
So a few weeks ago I had a major scare in the Mossytoadstool family- My dog chewed up my pin cushion!! Thankfully there were no pins in it (I only keep them in when I am doing a project) but I am now out of a place to put my pins!
I've been dying to make these anyway, so this was the perfect moment!      If you're interested in having one I am selling them here: Toadstool House Pin Cushions Labels: artwork, for sale, Mushroom Forest Spirit (Personal Collection) This is my biggest Faeline yet- About the size of a real Maine Coon cat. Real Moss was used for the back, three different kinds. The Snail, Mushrooms, and ladybugs were hand sculpted by me. The wings are Plastic sheet and fantasy film. The inner structure is made in a way were it only bends at where the joints would be in a real cat. So there are more realistic poses it can do. These pictures don't do it justice.          Labels: butterfly, Faeline, moss, Personal Collection |


 Hello. My name is Brittany Wolf. I was born in Las Vegas Nevada in '88. Ever since I can remember I would draw. My mother being my biggest influence, doing things from stained glass to murals to airbrushing and sewing. I started my love for sculpting in my softmore year of highschool, but only recently in '10 I decided to make it my profession.

